-
MenuBack
- Home
-
Categories
-
- About US
- OUR projects
- Contact US
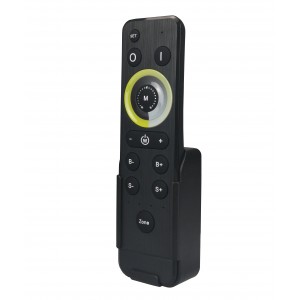
Remote HX-RFBK-DIM-2.4G 4 zones remote Control (HDBK-LV)
LED lighting fixtures, priced directly from the manufacturer.
Call now 060886600 / 078893738.
3 year guarantee.
Made in Moldova.
*ATENȚIE! *WARNING! Please advise your consultant of product availability while stocks last.
Features:
1) Working voltage: 3V (AAA*2);
2) Adopts RF 2.4GHz wireless control, remote control distance up to 30m and no directional;
3) Unique interface, and easy to operate;
4) DIM/CCT 2 in 1.
5) 4- zone control function: single zone control or overall control, controlled area showed with indicator light, more intuitive;
6) Flexible scene control function, easy to set up different scenes with zones.
7) Come with holder, easier access and keeping;
8) Two way for accessories installation, flexible choice;
9) RFBT10 compatible with HD/HC/QD/QC/DLC/DLS/DLK/T2 series dimming drivers;
10) 3 years warranty.
Technical Parameters
| Working temperature | -20-60℃ | Working voltage | 3V (AAA*2PCS) |
| Sleep current | <25uA | Emission current | <20mA |
| Sleep power consumption | <75uW | Emission power consumption | <60mW |
| Net weight | 90g | Dimension | L150*W40*20 (mm) |
| RF distance | ≤30m | RF frequency | 2.4GHz |
| Accessories | bracket 1pc, 3M foam sponge glue 1pc, screw 2pcs, expansion tube 2pcs. | ||
Direction for use
Each buttons function as below:
| Name of key | Description |
| ON | ON in any time |
| OFF | OFF in any time |
| Mode | 3 static modes: DIM: 20%, 50%, 100% CCT: warm white, cool white, pure white |
| Brightness + | Bright up the brightness by 1024 levels. Long-press will get fast adjusting. |
| Brightness - | Dim down the brightness by 1024 levels. Long-press will get fast adjusting. |
| S1-S4 | Short-pressing in single zone state to show the set state of corresponding zone; Short-pressing in overall-control state to show the set state of all zones. Scene setting operation:
DIM: 10%/30%/70%/100% brightness for all zones. CCT: 6000K, 4900K, 3800K, 2700K for all zones. |
| Zone selection key | Zone selection, 2 seconds long-press get “all-control”, indicator lights will light up accordingly. |
Wireless remote control code value setting method
The biggest advantage of this system is that it can not only solve the cabling problem in engineering wirelessly, but also realize a wired-like operation experience. In order to facilitate the early testing and debugging of the project, the factory status of the receiver is normally unpaired and each remote controller has a unique code value. The user should perform the matching work of the remote controller and the receiver during the installation of the project to avoid the mutual influence of the radio frequency remote control technology during the later use.
Please pay attention to the following 3 points before operation:
1) All equipment in the complete system after installation should have a unified and unique code value, so as to achieve the security and stability of the system.
2) The receiver can only store one code value and cannot be overwritten. Before learning the new code value, it is necessary to clear the original code of the receiver; the remote controller can only save one code value but can be overwritten and can also restore the factory settings. In order to facilitate the later maintenance, the three components that may be involved in the system (including receivers, handheld remote controllers, and panel remote controllers) can realize mutual learning of code values.
3) Since the receiver performs code value learning in the power-on state, in order to avoid confusion in the area, it is recommended that each area has an independent power switch so that the power of other areas can be easily cut off when the code is being operated.
(1)Code pairing operation: means that the receiver will only be controlled by the value code remote controller.
| Step | Operation | Instructions |
| 1 | Connecting the load to the receiver and power on it. | 1.It is necessary to clear the code first, if the receiver was coded before. 2.Batch operation can be performed within the remote control range. |
| 2 | Select area | Select the area with the "Zone" key and the corresponding indicator lights up |
| 3 | Press and hold “ON” on the remote control for 5 seconds, the indicator of the remote control will flash quickly, means it enters the pairing code transmission status. | Will automatically exit code transmission status after 60 seconds, or pressing any key to exit. |
| 4 | See the load light flashes 3 times and return to the initial state | Pairing coding is finished successfully |
(2)Code clearing operation: means that the original code value of the receiver will be cleared and returned to the factory state. Then it can be controlled by any compatible remote controller, and can learn to a new code.
| Step | Operation | Instructions |
| 1 | Connecting the load to the receiver and power on it. | 1. The clearing operation should be finished within 1 minutes after the receiver is powered on. If exceeds the time, can be powered on again. 2. Batch operation can be performed within the remote control range. |
| 2 | Press and hold the remote control “Off” for 5 seconds. The indicator of the remote control flashes quickly, means it enters the clearing code transmission status. There is no need to select the corresponding area when clearing code. | 1. Will automatically exit code transmission status after 60 seconds, or pressing any key to exit. 2. If the original remote controller is lost, the new remote controller can be used for clearing operations. |
| 3 | See the load light flashes 3 times and return to the initial state | Clearing coding is finished successfully |
(3)Code learning operation between remote controls: Used to unify system code values or copy a new remote controls.
Since each remote controller has its own unique code at the time of delivery, when there are multiple remote controllers in one system, one of them (for example, remote controller A) must be selected as the system code value, and the code value of the rest remote controllers (for example, remote controller B) should be copied to the same one.
| Step | Operation | Instructions |
| 1 | A remote control:Press and hold “ON” on the remote control for 5 seconds, the indicator of the remote control will flash quickly, means it enters the pairing code transmission status. | Will automatically exit code transmission status after 60 seconds, or pressing any key to exit. |
| 2 | B remote control: long press "mode key" for 5 seconds, the remote indicator light changes from 100% light to 5% light and flash, means entering the code value receiving state | Will automatically exit the code value receiving state after 30 seconds, or exit after learning the code value successfully. |
| 3 | see the B remote control indicator light flash 3 times | Code copying is finished and exit code value receiving status. |
(4) Copying code from receiver to remote control.
A new remote control can also copy code from any one of the receivers in the whole system, after the successful operation, the new remote control can replace the original remote (if it is lost).
| Step | Operation | Instructions |
| 1 | Cut off the power of receiver. | Which one will be controlled by remote. |
| 2 | Long-press "mode key" for 5 seconds, the remote indicator light changes from 100% light to off, means entering the code value receiving state. | Will automatically exit the code value receiving state after 30 seconds, or exit after learning the code value successfully. |
| 3 | Power on the receiver, will see remote control indicator light flash 3 times. | Code copying is finished and exit code value receiving status. |
* For security of the system, the distance from remote control to the one receiver should be less than 2 meters in this operation.
*Only one time operation is requested for the whole system, no need different operation for different zones.
(5) The remote control restores the factory setting: it means that the remote control will be restored to the factory's unique code value.
| Step | Operation | Instructions |
| 1 | Long press "mode " for 20 seconds. | The remote indicator light dim down and flashes continuously until the 20th second and then back to 100% light. Means this step is finished. |
| 2 | Press the "OFF" to confirm, the remote indicator light flashes 3 times. | Restore factory settings successfully. |
Accessories include bracket 1pc, 3M foam sponge glue 1pc, screw 2pcs, expansion tube 2pcs.
There are 2 options for bracket installation:
1) Using screw and expansion tube make drilling installation (suitable for uneven and ash surface);
2) Using 3M foam sponge glue make free drilling installation (suitable for flat no ash surface).
Product information for placing order
| Product name | Item number |
| RF 2.4G Multi-zone Remote Control (DIM & CCT) | HX-RFBT10 |
Specific References
No customer reviews for the moment.
